
 Rationale
One of the most promising features for DNSsec is the ability to tell a client which certificate to expect when connecting via Transport Layer Security (TLS). RFC 6698 specifies how TLS Authentication information can be put into DNSsec. So when you ask for the IP address of the server, you can simultaneously obtain the information which certificate should be presented when connecting. This has the potential to greatly simplify certificate handling:
- No more costly and error-prone CAs
You no longer need to get an external CA to sign your public key (and typically mess up with the information you carefully put into the enclosing certificate) - Full local control
You are in control of which certificate to use for which service on which host. - Flexibility
Sites will be provided with much more flexibility when handling the list of hostnames and protocols it should respond to; even more flexibility (and security) than the wildcard SSL certificates, which fewer and fewer CAs support. - Faster connection, less traffic
For sites supporting multiple virtual servers, the server no longer needs to send a huge certificate with all potential hostnames it can be reached at. (BTW: Updating them is also a real pain, believe me!) - Upgrading
Revoking/replacing certificates is much easier.
In general, I expect widespread support for this by browsers and other clients (mail, instant messaging, …) will make the Internet safer, as more sites can be inherently trusted and your exposure to eavesdroppers, e.g. when using a public Wi-Fi network, will be greatly reduced.
Problems
- SHA-256 fingerprints
Most will know how to extract the fingerprint of the certificate. However, most certificates and tools only handle SHA-1 or the (deprecated) MD5Â fingerprints. TLSA records, however, only support SHA-256 or SHA-512 fingerprints. - Adding to DNS
Several name servers do not yet support TLSA natively.
Howto
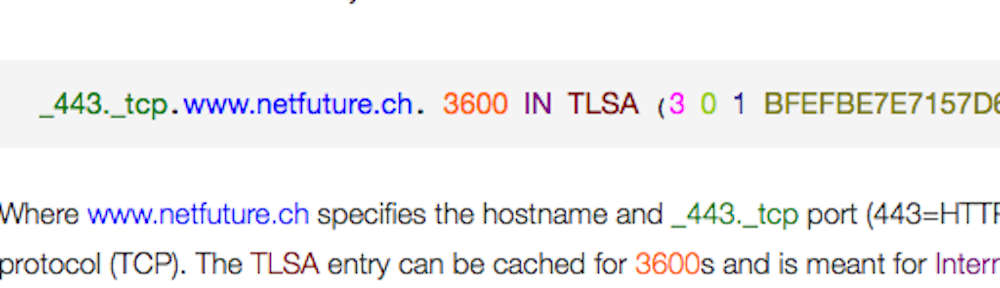
The format of the TLSA entry would be as follows:
_443._tcp.www.netfuture.ch. 3600 IN TLSA (3 0 1 BFEFBE7E7157D66B1F6FF58C1E5BE2B8F7AF92B84130EABA59EEC3D4052650BC)
Where www.netfuture.ch specifies the hostname and _443._tcp port (443=HTTPS) and protocol (TCP). The TLSA entry can be cached for 3600s and is meant for Internet use. The hash is calculated in SHA-256 (1) from the entire certificate (0) and specifies that it is the host’s certificate, which does not need to be further verified (3).
However, if you are using an earlier version of ISC BIND (before 9.8.3), or some other DNS server, which does not yet know about the TLSA RR, you may need to write the above line as shown below into your zone file.
_443._tcp.www.netfuture.ch. 3600 IN TYPE52 \# 35 03 00 01 BFEFBE7E7157D66B1F6FF58C1E5BE2B8F7AF92B84130EABA59EEC3D4052650BC
Here, \# indicates that the field is hex-encoded, the directly following 35 gives the length in bytes (3 control bytes, 32 hash bytes). The control values need to be padded to two (hex!) digits.
To generate the fingerprint, use the following command:
$ openssl x509 -noout -fingerprint -sha256 < /path/to/your/certificate/file | tr -d :
Please note that many versions of openssl do support SHA-256 as the fingerprint algorithm, even though the manual or help does not specify it. “tr” deletes the colons, which must not be part of the zone file. The resulting output is then:
SHA256 Fingerprint=BFEFBE7E7157D66B1F6FF58C1E5BE2B8F7AF92B84130EABA59EEC3D4052650BC
All you need is to copy/paste BFEFBE…BC into the hash field of the zone file.
Updated 2017-08-29: To simplify updates, please consider following Viktor Dukhovni’s recommendations.
Alternatives
The first three numbers could also be used differently:
The first number is the sum of two optional values:
- 1, if it is the host’s certificate (as opposed to one of the upstream CA’s certificate) which was used in the hash calculation.
- 2, if the certificate does not need to be additionally verified against the client’s list of trusted CAs. This can be used if your ownership of DNS should imply you are the CA for your own hosts.
In our example above, both values were added, resulting in 3.[1]Updated 2018-03-01: Please note that a value of 3 also implies that the names on the certificate will not be checked. This is helpful for cases where (a) the name to validate against is not clearly identified, as e.g. in MX records; (b) there are too many names to store in the certificate. This option would also allow the elimination of SNI. See also my Game Changer post. Other valid values are 0 (specifies a parent CA certificate which must match, to prevent other CAs from hijacking your certificate, but still require normal CA chain tests), 1 (host’s certificate, again with CA chain test), or 2 (trust this parent certificate, even if it is not in your trusted CA list).[2]Updated 2017-08-29: Please note that, even though the two bits look orthogonal at first, only the combination 3 (aka DANE-EE) inhibits the certificate name comparison. All others are subject to comparing the subject alternate names against the basename of the requested DNS entry, www.netfuture.ch in the above example.
The second number could be set to 1, if the fingerprint should not be over the entire certificate, but only the public key and algorithm, collectively known as Subject Public Key Information.[3]Updated 2017-11-26: This can be achieved by using openssl rsa -in my.key -outform der -pubout | openssl dgst -sha256 -hex for RSA keys or openssl ec -in my.key -outform der -pubout | openssl dgst -sha256 -hex for Elliptic Curve (EC/ECC) keys.
The third number specifies the type of fingerprint:
- 0, if the entire certificate is copied into the “hash” argument
- 1, a SHA-256 hash
- 2, a SHA-512 hash


One response to “How to create DNSsec DANE TLSA entries”
[…] DANE (DNS-based Authentication of Named Entities), the mechanism that achieves this by adding TLSA (Transport Layer Security Authentication) records into DNS. But also other entries, such as ssh keys in SSHFP entries, or SPF and DKIM values […]